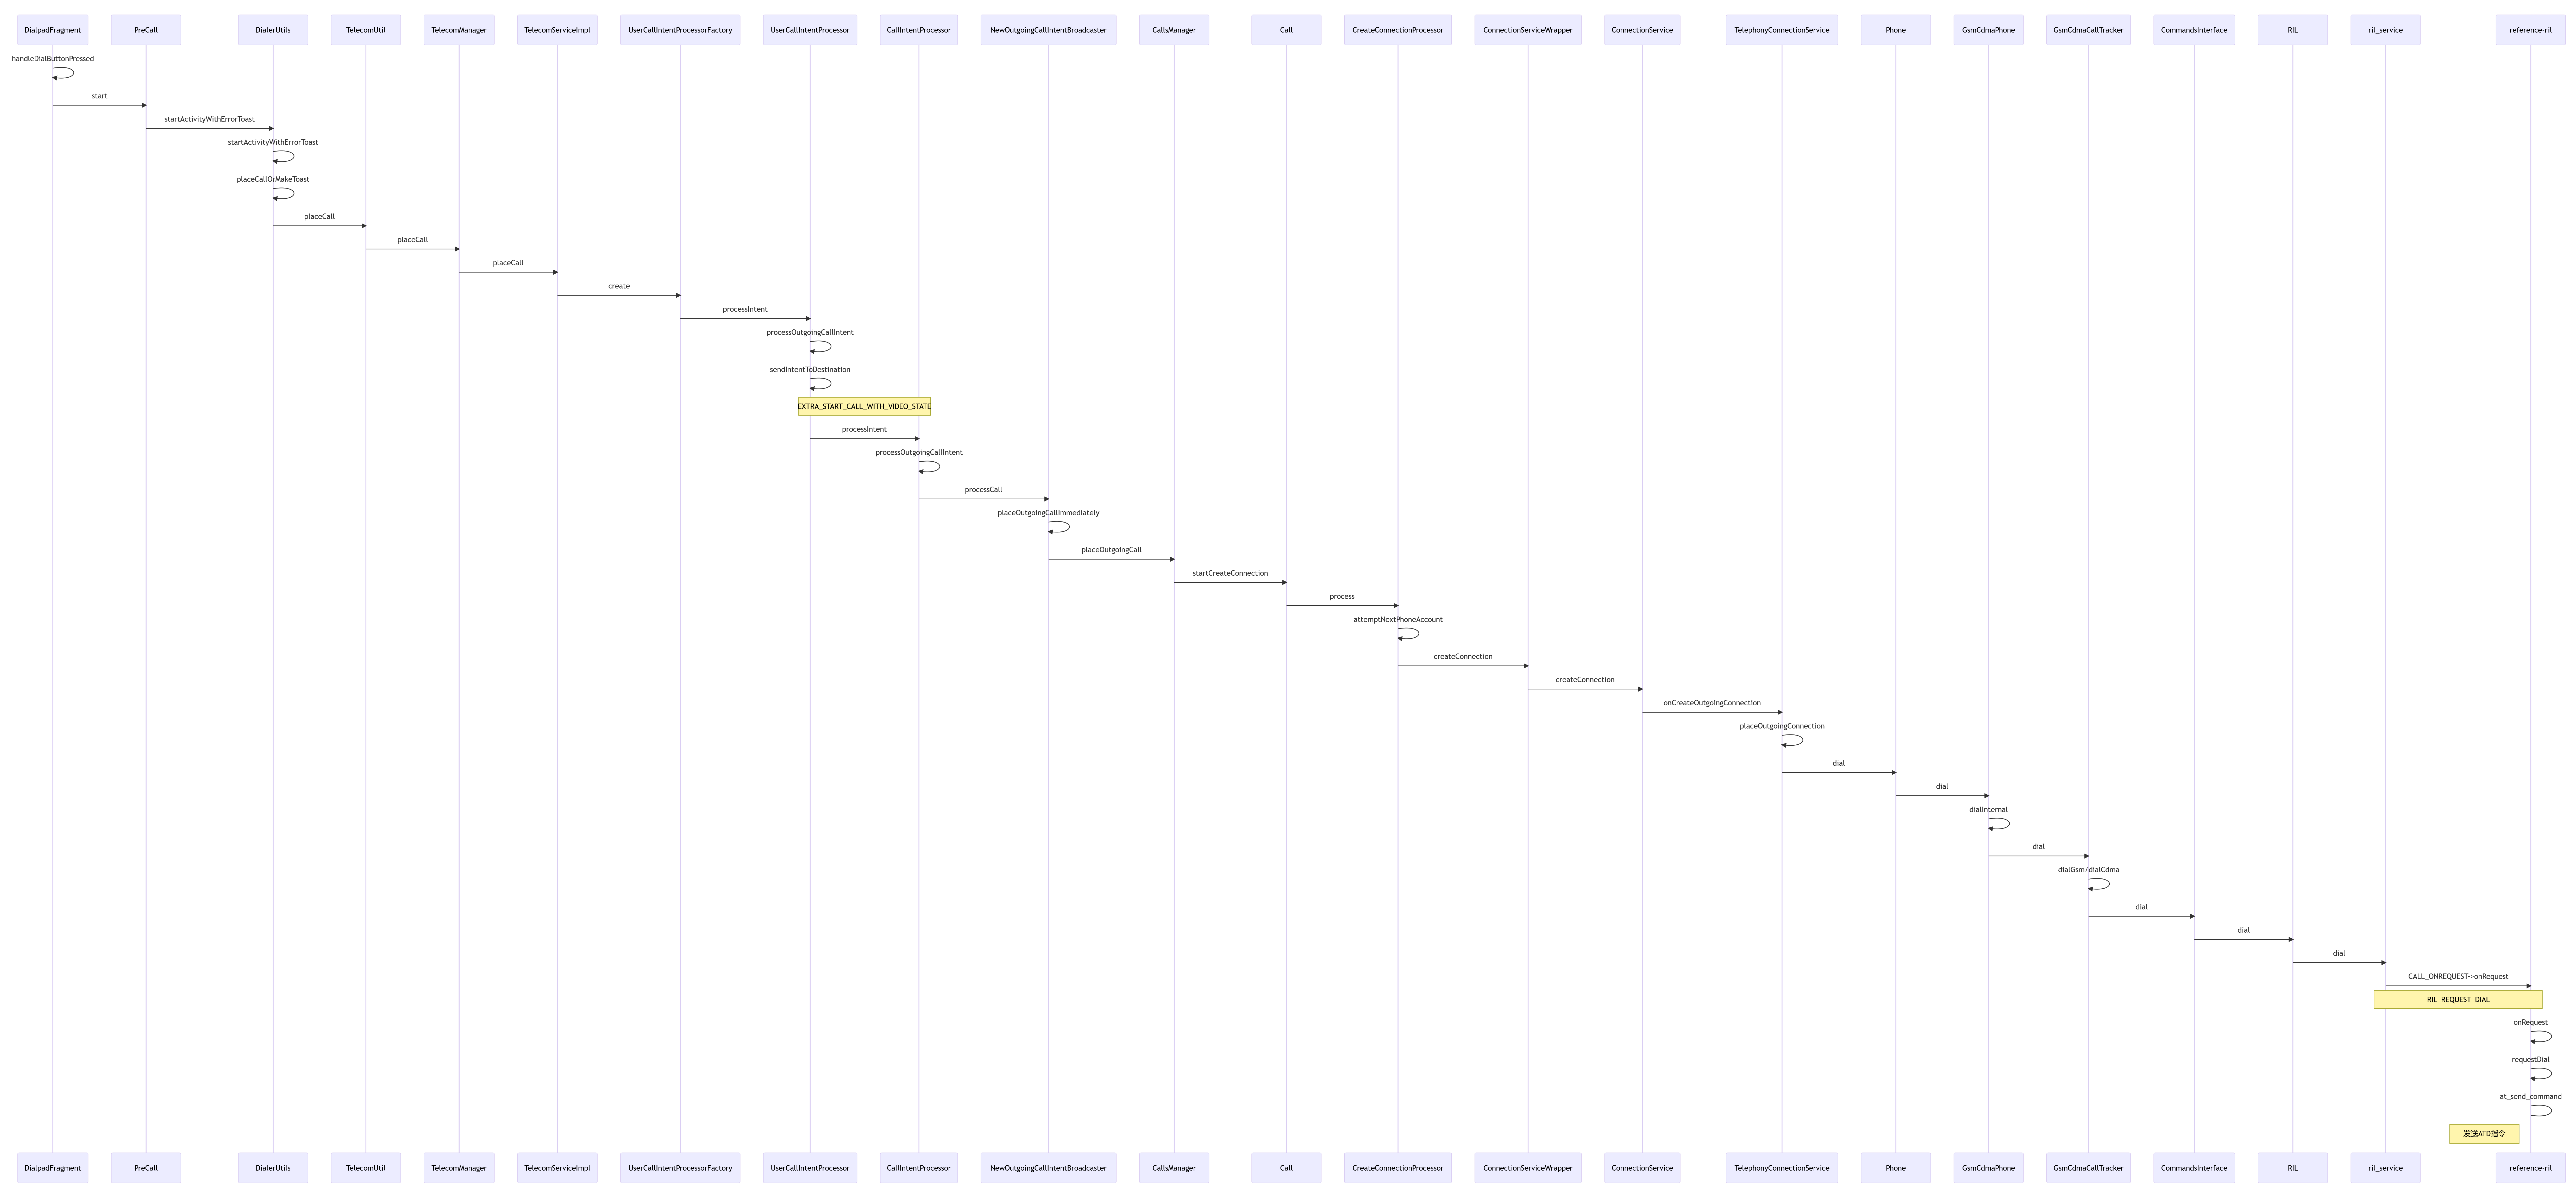
安卓11拨号流程
时间:2023-5-29 14:35
热度:1786°
评论:0 条

安卓11的拨号流程可以概括为以下几个步骤:
1. 用户在拨号界面按下拨号键,触发handleDialButtonPressed方法。
2. handleDialButtonPressed方法会获取用户输入的电话号码,并进行一系列的格式化和验证操作。
3. 如果电话号码格式正确,handleDialButtonPressed方法会调用TelecomService的placeCall方法,该方法会创建一个新的呼叫对象。
4. 呼叫对象会调用TelephonyConnection的dial方法,该方法会向Telephony框架发送一个拨号请求。
5. Telephony框架会根据当前的网络状态选择合适的RIL(Radio Interface Layer)实现,并向其发送ATD指令,该指令会触发底层的拨号操作。
6. RIL实现会将ATD指令发送给基带芯片,基带芯片会根据指令进行拨号操作。
7. 当呼叫建立成功后,Telephony框架会将呼叫状态更新到呼叫对象中,并通知TelecomService。
8. TelecomService会将呼叫状态更新到UI界面中,同时向系统发送通知,提示用户当前正在进行的呼叫。
流程图如下所示

sequenceDiagram
%涉及到的文件路径
%frameworks\base\telecomm
%frameworks\opt\telephony\src\java\com\android\internal\telephony
%packages\apps\Dialer\java\com\android\dialer
%packages\services\Telecomm\src\com\android\server\telecom
%packages\services\Telephony
%hardware\ril\libril
%hardware\ril\reference-ril
    DialpadFragment->>DialpadFragment:handleDialButtonPressed
    DialpadFragment->>PreCall:start
    PreCall->>DialerUtils:startActivityWithErrorToast
    DialerUtils->>DialerUtils:startActivityWithErrorToast
    DialerUtils->>DialerUtils:placeCallOrMakeToast
    DialerUtils->>TelecomUtil:placeCall
    TelecomUtil->>TelecomManager:placeCall
    %搜ITelecomService.stub
    TelecomManager->>TelecomServiceImpl:placeCall
    TelecomServiceImpl->>UserCallIntentProcessorFactory:create
    UserCallIntentProcessorFactory->>UserCallIntentProcessor:processIntent
    UserCallIntentProcessor->>UserCallIntentProcessor:processOutgoingCallIntent
    UserCallIntentProcessor->>UserCallIntentProcessor:sendIntentToDestination
    Note over UserCallIntentProcessor,CallIntentProcessor: EXTRA_START_CALL_WITH_VIDEO_STATE
    UserCallIntentProcessor->>CallIntentProcessor:processIntent
    CallIntentProcessor->>CallIntentProcessor:processOutgoingCallIntent
    CallIntentProcessor->>NewOutgoingCallIntentBroadcaster:processCall
    NewOutgoingCallIntentBroadcaster->>NewOutgoingCallIntentBroadcaster:placeOutgoingCallImmediately
    NewOutgoingCallIntentBroadcaster->>CallsManager:placeOutgoingCall
    CallsManager->>Call:startCreateConnection
    Call->>CreateConnectionProcessor:process
    CreateConnectionProcessor->>CreateConnectionProcessor:attemptNextPhoneAccount
    CreateConnectionProcessor->>ConnectionServiceWrapper:createConnection
    ConnectionServiceWrapper->>ConnectionService:createConnection
    %搜extends ConnectionService
    ConnectionService->>TelephonyConnectionService:onCreateOutgoingConnection
    TelephonyConnectionService->>TelephonyConnectionService:placeOutgoingConnection
    TelephonyConnectionService->>Phone:dial
    %搜extends Phone
    Phone->>GsmCdmaPhone:dial
    GsmCdmaPhone->>GsmCdmaPhone:dialInternal
    GsmCdmaPhone->>GsmCdmaCallTracker:dial
    GsmCdmaCallTracker->>GsmCdmaCallTracker:dialGsm/dialCdma
    GsmCdmaCallTracker->>CommandsInterface:dial
    %接口类搜implements CommandsInterface
    CommandsInterface->>RIL:dial
    %搜RadioImpl::dial
    RIL->>ril_service:dial
    ril_service->>reference-ril:CALL_ONREQUEST->onRequest
    Note over ril_service,reference-ril: RIL_REQUEST_DIAL
    reference-ril->>reference-ril:onRequest
    reference-ril->>reference-ril:requestDial
    reference-ril->reference-ril:at_send_command
    Note left of reference-ril: 发送ATD指令


捐赠支持:如果觉得这篇文章对您有帮助,请“扫一扫”鼓励作者!
本文无需标签!


发表吐槽
你肿么看?
既然没有吐槽,那就赶紧抢沙发吧!